MySQL 5.7 Active-Active replication on Ubuntu 16 Lts


For this recipe we got two identical (virtual) nodes, Both Ubuntu 16Lts, Quad CPU, 16G ram, OS on a 16G vda1, and a 2T data partition on vda2
Two network interfaces, 1st is public (192.168.32.x/24) and second in the replication network on 10Gbe (192.168.33.0/24)

DB01:
eth0 192.168.32.13
eth1 192.168.33.14
DB02:
eth0 192.168.32.23
eth1 192.168.33.23

First, set up both nodes for replication, Edit /etc/mysql/mysql.conf.d/mysqld.cnf
<snip>
bind-address            = 0.0.0.0
server-id               = 10 (20 for DB02)
log_slave_updates       = 1
log_bin                 = /var/log/mysql/mysql-bin.log
log_bin_index           = /var/log/mysql/mysql-bin.log.index
relay_log               = /var/log/mysql/mysql-relay-bin
relay_log_index         = /var/log/mysql/mysql-relay-bin.index
log-error = /var/log/mysql/error.log
auto_increment_increment = 2
auto_increment_offset = 1
expire_logs_days        = 10
max_binlog_size         = 100M
</snip>

Then restart Mysql: service mysql restart

On DB01 do mysql -u root -p and login

mysql> show master status;
+------------------+----------+--------------+------------------+-------------------+
| File             | Position | Binlog_Do_DB | Binlog_Ignore_DB | Executed_Gtid_Set |
+------------------+----------+--------------+------------------+-------------------+
| mysql-bin.000019 |      154 |              |                  |                   |
+------------------+----------+--------------+------------------+-------------------+
1 row in set (0.00 sec)

The file and position are needed for the master configuration on DB02, this is no longer done in the my.cnf file but in the DB, so open up mysql on DB02 and configure:

change master to master_host='192.168.33.13', master_user='slaveuser', master_password='somesupersecretpassword', master_log_file='mysql-bin.000019', master_log_pos=154, master_port=3306
grant replication slave on *.* to slaveuser@'db01.yourdomain.com' identified by 'somesupersecretpassword';
grant replication slave on *.* to slaveuser@'192.168.33.13' identified by 'somesupersecretpassword';
flush privileges;
start slave;
slave status \G;

Now you have one way replication, to make it two way, do a show master status on DB02, and do the same configuration on DB01, replacing .13 with .23 and db01 with db02 and of course the file and position values where applicable.

Now create some databases and see them appear on the other side.

Note, this does not replicate existing databases, this is meant for a CLEAN server. If you have existing databases,  you will first need to backup/restore them to the replica node before setting up the replication. If you do any action on a pre-existing DB the replication will halt, when this happens, just do a show master on the source and get the file and position values, then reset the replication on the slave DB (first stop the replication slave with stop slave, start it again when done.

InfluxDB IfHCInOctets Query


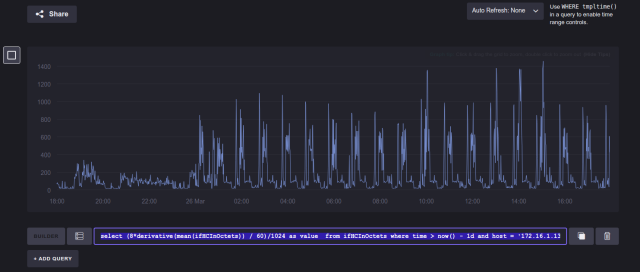
Some basic SQL for InfluxDB to fetch the SNMP ifHCInOctets from a table and show them as per minute Mbit/S, hope it helps you make beautiful graphs

select (8*derivative(mean(ifHCInOctets)) / 60)/1024 as value  from ifHCInOctets where time > now() - 1d and host = '172.16.1.13' and instance = 'pppoe0' GROUP BY time(1m)

172.16.1.13 is some router of course (we poll VyOS devices) and ‘pppoe0’ is an interface (could be eth0,eth1 etc etc)

Cheers

J

Screenshot from 2016-03-26 18:03:54

Remote SSH Parallel processing


Ever need to update a whole bunch of (Ubuntu) hosts and got tired of manual processing. Why not hack a little script to do it for you.

First we need a list for servers in a text file. Mine is called servers.list and contains the hostnames of the hosts that need to be processed, like so;

amber.integrative.it
angela.integrative.it
christel.integrative.it
linda.integrative.it
...
..
.

For authentication I use SSH/RSA, so my admin station has privs on every host. If you have not set that up, do an ssh-copy-id root@hostname.something to copy your Key over to the hosts (yes I use root here, bad bad bad..)

Then this simple script will do the magic for you, mine is called do-servers.sh (don’t forget to chmod +x the script)

#!/bin/bash
command="$1"
while read -u999 server; do
 (echo + Processing $server - $command;ssh root@$server $command;echo - Done $server - $command) &
done 999< servers.list
wait

(the while loop uses another file handle to keep out of the way of the stdout of ssh, we block the whole ssh command with () and execute in the background with &, finally the wait at the end does what it says, wait for everything to be done.

Now all that remains is to call the script with something like ./do-servers.sh ‘apt-get disk-upgrade -y’ (put your command between parentheses to make it a single parameter.

Cest Ca..


Alfresco 5 – Zimbra 8


How to link Alfresco 5 to a Zimra 8.6 LDAP.

First set your authentication_chain and sync properties in

./tomcat/shared/classes/alfresco-global.properties

Replace all the bold domain/password stuff with your own of course, and use the admin account of zimbra to connect into the OpenLdap part.

Like so:

### Use Alfresco authentication for admin accounts and LDAP for users ###
authentication.chain=alfrescoNtlm1:alfrescoNtlm,ldap1:ldap
## For DEV, set synchronizeChangesOnly to false for FULL SYNC
synchronization.synchronizeChangesOnly= true 
## Set up regular synchronization with the LDAP server ##
synchronization.syncWhenMissingPeopleLogIn=true
synchronization.syncOnStartup=true
synchronization.import.cron=0 */15 * * * ?

Then create an ldap-authentication.properties File in:

./tomcat/shared/classes/alfresco/extension/subsystems/Authentication/ldap/ldap1

# LDAP Settings for OpenLDAP sync and auth

ldap.authentication.active=true
ldap.authentication.allowGuestLogin=false
ldap.authentication.userNameFormat=uid=%s,ou=people,dc=integrative,dc=it

# The LDAP context factory to use
#ldap.authentication.java.naming.factory.initial=com.sun.jndi.ldap.LdapCtxFactory

# The URL to connect to the LDAP server 
ldap.authentication.java.naming.provider.url=ldap://1.2.3.4:389

# The authentication mechanism to use for password validation
ldap.authentication.java.naming.security.authentication=simple

# Escape commas entered by the user at bind time Useful when using simple authentication and the CN is part of the DN and contains commas

ldap.authentication.escapeCommasInBind=false
ldap.authentication.escapeCommasInUid=false

# Comma separated list of user names who should be considered administrators by default
ldap.authentication.defaultAdministratorUserNames=admin

# Enable FTP authentication using LDAP
ldap.authentication.authenticateFTP=true

ldap.synchronization.active=true
ldap.synchronization.java.naming.security.authentication=simple
ldap.synchronization.java.naming.security.principal=uid=admin,ou=people,dc=root,dc=domain
ldap.synchronization.java.naming.security.credentials=yourpassword

ldap.synchronization.queryBatchSize=50
ldap.synchronization.attributeBatchSize=0

# The query to select all objects that represent the groups to import.

ldap.synchronization.groupQuery=(objectclass\=zimbraDistributionList)
ldap.synchronization.groupDifferentialQuery=(&(objectclass\=zimbraDistributionList)(!(modifyTimestamp< \={0})))
ldap.synchronization.groupSearchBase=ou\=people,dc\=integrative,dc\=it

ldap.synchronization.personQuery=(objectClass\=organizationalPerson)
ldap.synchronization.personDifferentialQuery=(&(objectclass\=organizationalPerson)(!(modifyTimestamp<\={0})))
ldap.synchronization.userSearchBase=ou\=people,dc\=integrative,dc\=it

# The name of the operational attribute recording the last update time for a group or user.
ldap.synchronization.personType=organizationalPerson
ldap.synchronization.modifyTimestampAttributeName=modifyTimestamp
ldap.synchronization.timestampFormat=yyyyMMddHHmmss'Z'
ldap.synchronization.userIdAttributeName=uid
ldap.synchronization.userFirstNameAttributeName=givenName
ldap.synchronization.userLastNameAttributeName=sn
ldap.synchronization.userEmailAttributeName=mail
ldap.synchronization.userOrganizationalIdAttributeName=ou
ldap.synchronization.defaultHomeFolderProvider=userHomesHomeFolderProvider

ldap.synchronization.groupIdAttributeName=mail
ldap.synchronization.groupDisplayNameAttributeName=mail
ldap.synchronization.groupType=zimbraDistributionList
ldap.synchronization.personType=zimbraMailRecipient
ldap.synchronization.groupMemberAttributeName=zimbraMailForwardingAddress

ldap.synchronization.enableProgressEstimation=true
ldap.authentication.java.naming.read.timeout=0

That;s all, reload or reboot and log in

HP/ILO troubles


The wonderful security updates in Firefox (and Chrome) will give you the dreaded SSL_ERROR_BAD_MAC_ALERT. So no more ILO for you 😦

How to mitigate that?, well first do as told in the article above, go to about:config in firefox and set the security.tls.version.fallback-limit to 1.

How you can access the ILO and update the firmware to 2.29 for ILO2 (or higher), as instructed here, you can fetch the ILO2 firmware  Here

HP has a habit of only updating the Windoze firmware binaries, forgetting that most of the internet runs on Linux, but anyway just download the EXE and extract the ilo229.bin from the file.

If you don’t like the clickerdyclick web interface, or have more than 2 servers to update, it makes sense to put your binary on some web server  in your environment and just ssh into your ILO and update from there, the magic is done like so:

load -source http://192.168.1.11/iso/HP/Firmware/ilo2_229.bin /map1/firmware1

(192.168.1.11/iso…. is our internal web server of course, replace with your own)

O and don’t forget to set your FireFox security.tls.version.fallback-limit back to 3 🙂

Ces’t Ca..

VyOS Backup


Want to make backups of your VyOS router/firewall, This little script might help, It takes the config and converts it into set commands for easy restore on another box. We push it to an RSYNC on a ZFS/Nexenta server, but you put it anywhere as you like. Schedule it through Cron or better through the system task scheduler.

Don’t forget to use the commit archive to record your changes for the audit trails, like so :

set system config-management commit-archive location 'scp://admin:<password>@x.x.x.x/volumes/pool1/backup/vyos'

VyOS backup.sh Script: (store in /config/scripts/backup/ and do not forget to make it executable : chmod +x /config/scripts/backup/backup.sh)

# Vyos (1.6) Backup Script (jkool@integrative.it)
# Fetch me with scp root@x.x.x.x:/volumes/pool1/backup/vyos/backup.sh /config/scripts/backup/backup.sh
# Keep 5 versions local 
#
# Schedule with:
#
# set system task-scheduler task backup executable path '/config/scripts/backup/backup.sh'
# set system task-scheduler task backup interval '8h'

h=$(hostname)
d=$(date +"%Y%m%d%H%M")
dest=192.168.1.200::pool1_backup/vyos
scripts=/config/scripts/backup

cd $scripts

tar -czf $scripts/backup-auth-$h-$d.tar.gz /config/auth
/opt/vyatta/sbin/vyatta-config-gen-sets.pl > $scripts"/backup-config-"$h"-"$d".txt"

ls -F backup-config-$h*.txt | head -n -5 | xargs rm
ls -F backup-auth-$h*.tar.gz | head -n -5 | xargs rm

rsync $scripts/backup-config-$h-$d.txt $dest/$h
rsync $scripts/backup-auth-$h-$d.tar.gz $dest/$h


Alfresco 5.0.d + OpenLdap


Can’t believe I once hired an Indy IT mercenary to configure this for MS/AD, sad really. Anyways was bored today and had some time so dug up my DEV server for Alfresco and found it was still using an internal database for authentication. So I took the trouble of configuring it to use the OpenLdap server we now use for all Authentications down here.

So how to get to it, firstly out Alfresco sits in /opt/alfresco (that might be different for you) from here make a folder for the ldap class like so:

mkdir -P /opt/alfresco/tomcat/shared/classes/alfresco/extension/subsystems/Authentication/ldap/ldap1

Now if you want to go from a template get the 5.0.d binary from GitHub and extract the ldap-authentication.properties to work on, like so:

wget https://github.com/Alfresco/community-edition/archive/V5.0.d.tar.gz
 tar -zxvf V5.0.d.tar.gz -C ~/tmp --wildcards --no-anchored 'ldap-authentication.properties'
 find tmp -type f -exec mv -i {} . \;
You can also just copy and paste this below to modify to your liking
 
 # LDAP Settings for OpenLDAP sync and auth
 ldap.authentication.active=true
 ldap.authentication.allowGuestLogin=false
 ldap.authentication.userNameFormat=uid=%s,ou=users,dc=integrative,dc=it
 # The LDAP context factory to use
 #ldap.authentication.java.naming.factory.initial=com.sun.jndi.ldap.LdapCtxFactory
 # The URL to connect to the LDAP server
 ldap.authentication.java.naming.provider.url=ldap://ldap.legal-it.net:389
 # The authentication mechanism to use for password validation
 ldap.authentication.java.naming.security.authentication=simple
 # Escape commas entered by the user at bind time Useful when using simple authentication and the CN is part of the DN and contains commas
 ldap.authentication.escapeCommasInBind=false
 ldap.authentication.escapeCommasInUid=false
 # Comma separated list of user names who should be considered administrators by default
 ldap.authentication.defaultAdministratorUserNames=admin
 # Enable FTP authentication using LDAP
 ldap.authentication.authenticateFTP=true
 ldap.synchronization.active=true
 ldap.synchronization.java.naming.security.authentication=simple
 ldap.synchronization.java.naming.security.principal=cn\=admin,dc\=integrative,dc\=it
 ldap.synchronization.java.naming.security.credentials=supersecretpassword
 ldap.synchronization.queryBatchSize=50
 ldap.synchronization.attributeBatchSize=0
 # The query to select all objects that represent the groups to import.
 ldap.synchronization.groupSearchBase=ou\=groups,dc\=integrative,dc\=it
 ldap.synchronization.groupQuery=(objectclass\=groupOfNames)
 ldap.synchronization.groupDifferentialQuery=(&(objectclass\==groupOfNames)(!(modifyTimestamp<\={0})))
 ldap.synchronization.userSearchBase=ou\=users,dc\=integrative,dc\=it
 ldap.synchronization.personQuery=(objectclass\=inetOrgPerson)
 ldap.synchronization.personDifferentialQuery=(&(objectclass\=inetOrgPerson)(!(modifyTimestamp<\={0})))
 # The name of the operational attribute recording the last update time for a group or user.
 ldap.synchronization.modifyTimestampAttributeName=modifyTimestamp
 ldap.synchronization.timestampFormat=yyyyMMddHHmmss'Z'
 ldap.synchronization.userIdAttributeName=uid
 ldap.synchronization.userFirstNameAttributeName=givenName
 ldap.synchronization.userLastNameAttributeName=sn
 ldap.synchronization.userEmailAttributeName=mail
 ldap.synchronization.userOrganizationalIdAttributeName=o
 ldap.synchronization.defaultHomeFolderProvider=largeHomeFolderProvider
 ldap.synchronization.groupIdAttributeName=cn
 ldap.synchronization.groupDisplayNameAttributeName=description
 ldap.synchronization.personType=inetOrgPerson
 ldap.synchronization.groupType==groupOfNames
 ldap.synchronization.groupMemberAttributeName=member
 ldap.synchronization.enableProgressEstimation=true
 ldap.authentication.java.naming.read.timeout=0

The path for this file should be

/opt/alfresco/tomcat/shared/classes/alfresco/extension/subsystems/Authentication/ldap/ldap1/ldap-authentication.properties

Now edit your alfresco global properties to call the new class for authentication and sync, just add the following to the top

### Use Alfresco authentication for admin accounts and LDAP for users ###
authentication.chain=alfrescoNtlm1:alfrescoNtlm,ldap1:ldap
## For DEV, set synchronizeChangesOnly to false for FULL SYNC
synchronization.synchronizeChangesOnly=true
## Set up regular synchronization with the LDAP server ##
synchronization.syncWhenMissingPeopleLogIn=true
synchronization.syncOnStartup=true
synchronization.import.cron=0 */15 * * * ?

And ce’st ca., you will be synchronizing with LDAP every 15 mins or on startup, so maybe a good time to restart the alfresco server and see if it works.


ESXI Nexenta 4, round robin, iops=1, no Hardware Accelerated Locking


Nexenta 4 (CE) on ESXI (5/6) sort of fails when you have Hardware Accelerated Locking enabled. You will see a ton of errors in your vmkernel log about this once you activate your ISCSI.

To get it all going again here is a quick snippet.

esxcli system settings advanced set -i 0 -o /VMFS3/HardwareAcceleratedLocking

esxcfg-rescan vmhba32

for i in `esxcfg-scsidevs -c |awk '{print $1}' | grep naa.600`; do esxcli storage nmp device set -d $i --psp VMW_PSP_RR;done

for i in `esxcfg-scsidevs -c |awk '{print $1}' | grep naa.600`; do esxcli storage nmp psp roundrobin deviceconfig set --type=iops --iops=1 --device=$i; done

The first line disables the HW accelerated locking, e.g. back to basics. Then we do a rescan of vmhba32 (SW/ISCSI), then push all disks to VMW_PSP_RR and set the IOPS to 1 for optimal distribution,

C’est ca..

PostFix as a mail relay Ubuntu 14 LTS


This took some time, so i’d thought I might share it. If you have any improvements or comments, feel free to contribute.

The scenario, we have multiple post-fix mail relay servers sitting behind various ISP’s in various clouds or data-centers, they all point to a single (cluster) of mail servers (Zimbra of course). It took some time to get these MX’s to do the right thing with SMTP / TLS and SASL.

The MX sits behind a firewall on a private ip (172.16.1.25) (VyOS) which publishes TCP 25 and 465 for the communications.

First apt-get install postfix on a clean Ubuntu 14 LTS server, set it up as a satellite when dpkg-configure asks you to.

Then fetch the TLS and SASL dependencies

apt-get install  sasl2-bin postfix-tls sasl2-bin libsasl2-modules

For some odd reason, the socket links in /run between sasl authd and postfix don’t add up. A mess of security and other oddness. So in a quick and dirty way we fix this on reboot in a script called /etc/postfix/fixlink.sh

rm -r /var/run/saslauthd/
mkdir -p /var/spool/postfix/var/run/saslauthd
ln -s /var/spool/postfix/var/run/saslauthd /var/run
chgrp sasl /var/spool/postfix/var/run/saslauthd
service postfix restart
/etc/init.d/saslauthd start

To get Postfix to use the plain login for SASL configure the file /etc/postfix/sasl/smtpd.conf

pwcheck_method: saslauthd
mech_list: plain login

You can find some more details on the how and why here

Now for the Meat and Potatoes, the /etc/postfix/main.cf file:

inet_interfaces = all
myhostname = mx01.yourdomain.com
mynetworks = 192.168.0.0/16, 127.0.0.1, 172.16.1.26
myorigin = mydomain.com
mydestination =
smtpd_banner = $myhostname ESMTP
smtpd_use_tls = yes
smtp_use_tls = yes
smtp_enforce_tls = no
# TLS parameters
smtp_tls_security_level = may
smtp_tls_session_cache_database = btree:${data_directory}/smtp_scache
smtp_tls_note_starttls_offer = yes
smtpd_tls_loglevel=2
smtpd_tls_auth_only = yes
smtpd_tls_security_level = may
smtpd_tls_cert_file=/etc/postfix/commercial.crt
smtpd_tls_key_file=/etc/postfix/commercial.key
smtpd_tls_session_cache_database = btree:${data_directory}/smtpd_scache
smtpd_tls_exclude_ciphers = aNULL, DES, 3DES, MD5, DES+MD5, RC4, RC4-MD5
smtpd_tls_received_header = yes
tls_random_source = dev:/dev/urandom
# Sasl
smtpd_sasl_path = smtpd
smtpd_sasl_security_options = noanonymous
smtpd_sasl_auth_enable = yes
smtpd_sasl_local_domain =
broken_sasl_auth_clients = yes
# Limits
default_process_limit = 100
smtpd_client_connection_count_limit = 10
smtpd_client_connection_rate_limit = 30
queue_minfree = 20971520
header_size_limit = 51200
message_size_limit = 10485760
smtpd_recipient_limit = 100
local_recipient_maps =
local_transport = error:no local delivery
parent_domain_matches_subdomains = debug_peer_list smtpd_access_maps
relay_domains = domain1.com domain2.com and some more domains
smtpd_recipient_restrictions =
 permit_sasl_authenticated,
 permit_mynetworks,
 reject_unauth_destination,
 reject_unverified_recipient
address_verify_negative_cache = no
unverified_recipient_reject_code = 550
maximal_queue_lifetime = 21d
relayhost = [your.mail.cluster.local]

Change the bold where appropriate of course

As you can see we use some SSL certs, these come from our own private CA, but you can use some self signed ones as well, just remember to cat the authorizing CA certificate into the CRT and have no password in your key. A lengthy explanation on the how and what can me found here

Now the /etc/postfix/master.cf, un-comment (or add) the bold lines and if all is equal, it should work…

#
# Postfix master process configuration file. For details on the format
# of the file, see the master(5) manual page (command: "man 5 master" or
# on-line: http://www.postfix.org/master.5.html).
#
# Do not forget to execute "postfix reload" after editing this file.
#
# ==========================================================================
# service type private unpriv chroot wakeup maxproc command + args
# (yes) (yes) (yes) (never) (100)
# ==========================================================================
smtp inet n - - - - smtpd
#smtp inet n - - - 1 postscreen
#smtpd pass - - - - - smtpd
#dnsblog unix - - - - 0 dnsblog
#tlsproxy unix - - - - 0 tlsproxy
submission inet n - - - - smtpd
# -o syslog_name=postfix/submission
 -o smtpd_tls_security_level=encrypt
 -o smtpd_sasl_auth_enable=yes
# -o smtpd_reject_unlisted_recipient=no
# -o smtpd_client_restrictions=$mua_client_restrictions
# -o smtpd_helo_restrictions=$mua_helo_restrictions
# -o smtpd_sender_restrictions=$mua_sender_restrictions
# -o smtpd_recipient_restrictions=
 -o smtpd_relay_restrictions=permit_sasl_authenticated,reject
 -o milter_macro_daemon_name=ORIGINATING
smtps inet n - - - - smtpd
# -o syslog_name=postfix/smtps
 -o smtpd_tls_wrappermode=yes
 -o smtpd_sasl_auth_enable=yes
# -o smtpd_reject_unlisted_recipient=no
# -o smtpd_client_restrictions=$mua_client_restrictions
# -o smtpd_helo_restrictions=$mua_helo_restrictions
# -o smtpd_sender_restrictions=$mua_sender_restrictions
# -o smtpd_recipient_restrictions=
 -o smtpd_relay_restrictions=permit_sasl_authenticated,reject
 -o milter_macro_daemon_name=ORIGINATING
#628 inet n - - - - qmqpd
pickup unix n - - 60 1 pickup
cleanup unix n - - - 0 cleanup
qmgr unix n - n 300 1 qmgr
#qmgr unix n - n 300 1 oqmgr
tlsmgr unix - - - 1000? 1 tlsmgr
rewrite unix - - - - - trivial-rewrite
bounce unix - - - - 0 bounce
defer unix - - - - 0 bounce
trace unix - - - - 0 bounce
verify unix - - - - 1 verify
flush unix n - - 1000? 0 flush
proxymap unix - - n - - proxymap
proxywrite unix - - n - 1 proxymap
smtp unix - - - - - smtp
relay unix - - - - - smtp
# -o smtp_helo_timeout=5 -o smtp_connect_timeout=5
showq unix n - - - - showq
error unix - - - - - error
retry unix - - - - - error
discard unix - - - - - discard
#local unix - n n - - local
virtual unix - n n - - virtual
lmtp unix - - - - - lmtp
anvil unix - - - - 1 anvil
scache unix - - - - 1 scache
#
# ====================================================================
# Interfaces to non-Postfix software. Be sure to examine the manual
# pages of the non-Postfix software to find out what options it wants.
#
# Many of the following services use the Postfix pipe(8) delivery
# agent. See the pipe(8) man page for information about ${recipient}
# and other message envelope options.
# ====================================================================
#
# maildrop. See the Postfix MAILDROP_README file for details.
# Also specify in main.cf: maildrop_destination_recipient_limit=1
#
maildrop unix - n n - - pipe
 flags=DRhu user=vmail argv=/usr/bin/maildrop -d ${recipient}
#
# ====================================================================
#
# Recent Cyrus versions can use the existing "lmtp" master.cf entry.
#
# Specify in cyrus.conf:
# lmtp cmd="lmtpd -a" listen="localhost:lmtp" proto=tcp4
#
# Specify in main.cf one or more of the following:
# mailbox_transport = lmtp:inet:localhost
# virtual_transport = lmtp:inet:localhost
#
# ====================================================================
#
# Cyrus 2.1.5 (Amos Gouaux)
# Also specify in main.cf: cyrus_destination_recipient_limit=1
#
#cyrus unix - n n - - pipe
# user=cyrus argv=/cyrus/bin/deliver -e -r ${sender} -m ${extension} ${user}
#
# ====================================================================
# Old example of delivery via Cyrus.
#
#old-cyrus unix - n n - - pipe
# flags=R user=cyrus argv=/cyrus/bin/deliver -e -m ${extension} ${user}
#
# ====================================================================
#
# See the Postfix UUCP_README file for configuration details.
#
uucp unix - n n - - pipe
 flags=Fqhu user=uucp argv=uux -r -n -z -a$sender - $nexthop!rmail ($recipient)
#
# Other external delivery methods.
#
ifmail unix - n n - - pipe
 flags=F user=ftn argv=/usr/lib/ifmail/ifmail -r $nexthop ($recipient)
bsmtp unix - n n - - pipe
 flags=Fq. user=bsmtp argv=/usr/lib/bsmtp/bsmtp -t$nexthop -f$sender $recipient
scalemail-backend unix - n n - 2 pipe
 flags=R user=scalemail argv=/usr/lib/scalemail/bin/scalemail-store ${nexthop} ${user} ${extension}
mailman unix - n n - - pipe
 flags=FR user=list argv=/usr/lib/mailman/bin/postfix-to-mailman.py
 ${nexthop} ${user}

Zimbra ZCS on Ubuntu 14 Lts


Zimbra, by far the best mail solution out there, making use of postfix, clamav, openldap, amavis,nginx,memcacheed and more defacto standard open source solutions to deliver an enterprise class email solution.

Deploying this to Ubuntu 14 is quite straight forward, but most of the guides out there seem to be incomplete, so here is mine.

Zimbra is a bit resource hungry since it relies on Java, so deploy a VM with 6GB mem (4 works too) and 4 cores. We use a standard 16GB OS partition and move our mailstore to an Nexenta/NFS store at later stage.

1st things first, fetch and untar the binary from zimbra.com, the site is rather slow so it takes some time. The version is 8.6.0/1153 at the time of writing.

wget https://files.zimbra.com/downloads/8.6.0_GA/zcs-8.6.0_GA_1153.UBUNTU14_64.20141215151116.tgz
tar -zxvf zcs*

Now, edit your hosts file and hostname to have the correct referrals

#cat /etc/hosts
127.0.0.1 localhost
192.168.1.15 cinhk1mail01.legal-it.net cinhk1mail01 mail

Now install the pre-requisites, for us on a image in our cloud we need to add

apt-get install libaio1 pax sysstat unzip libgmp10

Next run the ./install.sh and select the components you want. I don’t use DNS Cache since our Internal DNS is rigid and we have MX records for our domains set up correctly, if you do not have this sorted, use dnsmasq as described here: https://www.maketecheasier.com/install-zimbra-ubuntu-server/

Install zimbra-ldap [Y]
Install zimbra-logger [Y]
Install zimbra-mta [Y]
Install zimbra-dnscache [Y] N
Install zimbra-snmp [Y]
Install zimbra-store [Y]
Install zimbra-apache [Y]
Install zimbra-spell [Y]
Install zimbra-memcached [Y]
Install zimbra-proxy [Y] N

After installing the packages, this can take some time, Zimbra will complain about the domain name, change the domain from the FQDN to the actual domain-name

DNS ERROR resolving MX for cinhk1mail01.legal-it.net
It is suggested that the domain name have an MX record configured in DNS
Change domain name? [Yes] 
Create domain: [cinhk1mail01.legal-it.net] legal-it.net
 MX: cinhk1mx01.legal-it.net (192.168.1.15)

Now walk through the setup menu and set the passwords for the Admin user (in the zimbra-store submenu) I personally change all LDAP passwords to something we have recorded in our security database to make addition of servers and separation of roles at a later stage easier. Don’t forget to set the timezone in the common configuration as well. We also enable the option “Configure for use with web proxy: ” since in our house, access to webmail is done through an NGINX reverse proxy.

Now check your installation by running zmcontrol status as the zimbra user:

su - zimbra -c "zmcontrol status"

All should be running and happy at this moment, so it is time for a reboot and see if all comes back after.

Now log in to your zimbra server admin console using your favorite browser (https://cinhk1mail01.legal-it.net:7071) mind it’s an HTTPS. If your server shows all red in the server status (in contradiction to what zmcontrol status had told you before) you might have some RSYSLOG issues. In this case, just create a syslog file (/etc/syslog) with the content:

# Zimbra logs 
local0.* -/var/log/zimbra.log 
local1.* -/var/log/zimbra-stats.log 
auth.* -/var/log/zimbra.log 
mail.* -/var/log/zimbra.log

and reconfigure zimbra syslog for good measure with /opt/zimbra/libexec/zmsyslogsetup

And restart Zimbra (or reboot) (service zimbra restart), all should be green and happy after.

Now Zimbra can read the correct log files and determine the status of the services.

Next up is the install ZeXtras, an absolutely brilliant add in for Zimbra to enable ZCS to work well with mobile connections, do some easy backups, and most important easily move your data-stores around. We use it on all our production servers and it is certainly worth the few dollars they ask for it, if you need some quote or help with ZeXtras, drop us a line at sales@integrative.it

To install, first wget and untar the add-in.

wget http://www.zextras.com/download/zextras_suite-latest.tgz
tar -zxvf zextras_suite-latest.tgz
cd zextras_suite-2.0.3 
./install.sh all

2.0.3 is the version at hand to date, follow the install questions and after the install navigate back to the admin console, reload the page to see if the plug in is installed.

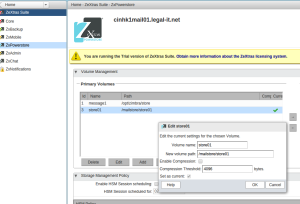
Now we have a Nexenta back end storage for NFS and ISCSI, so we use this as our data-store. We created a mount point /mailstore in which we created a folder called store01. we changed the owership to zimbra on this folder (chown zimbra:zimbra /mailstore/store01). Now navigate to the zxPowerstore section of ZexTras and add a new volume pointing to the NFS mount. We don’t need compression as the Nexenta server will take care of that for us.

Screenshot from 2015-09-17 13:47:06

It’s now time to add our wildcard certificate. If you don’t have one, just go through the setup wizard and create a self signed one or create a request for an issuer and skip this step. But in our case we have our own trusted CA from where we spawn certificates. So if you have the same, do the following:

go to the folder /opt/zimbra/ssl/zimbra/commercial, copy your CA certificate as commercial_ca.crt, your wildcard certificate as commercial.crt and the key as commercial.key. Now verify if all computes with

/opt/zimbra/openssl/bin/openssl verify -CAfile commercial_ca.crt commercial.crt

and if all is good, commit the certificates with

/opt/zimbra/bin/zmcertmgr deploycrt comm /opt/zimbra/ssl/zimbra/commercial/commercial.crt /opt/zimbra/ssl/zimbra/commercial/commercial_ca.crt

Now reload your admin page and check if your certificate is used

Now domains (and users) can be added to the server, for external ldap authentication, check this post: http://tonylixu.blogspot.com/2014/06/zimbra-807ga-how-to-configure-external.html